How to use FieldDrop Go
Steps 1 to 6 get you going. The rest explains the extras. The numbers on each screen match the list next to it.
Rather watch? Good to know: short videos
Jump to a section
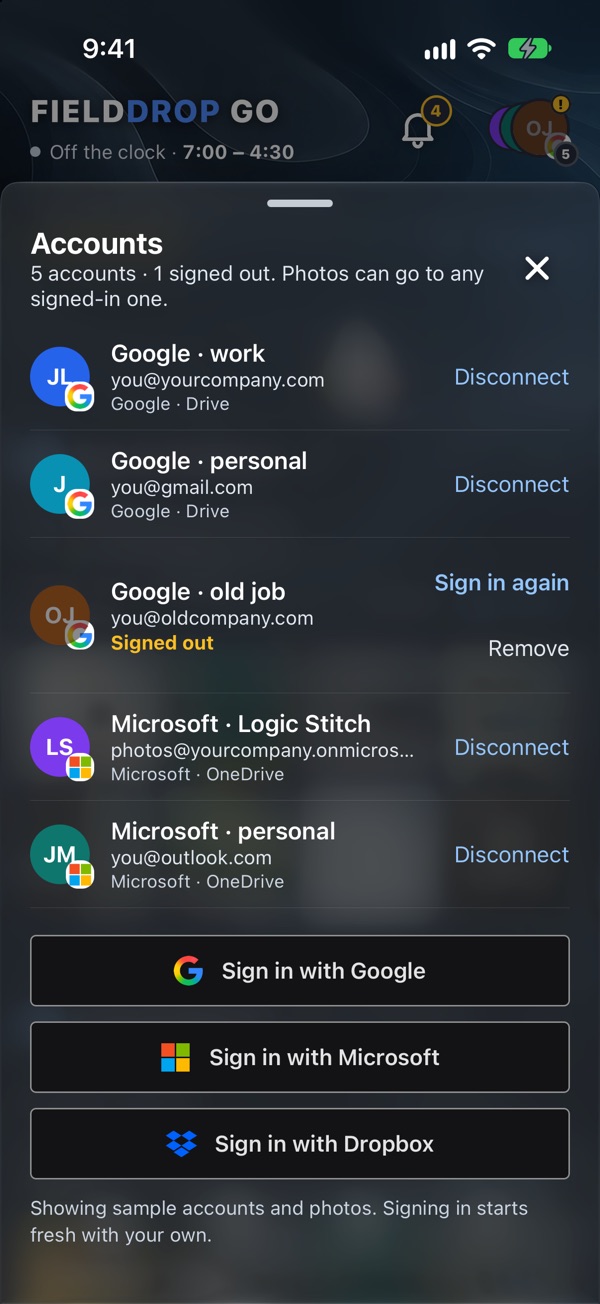
Step 1
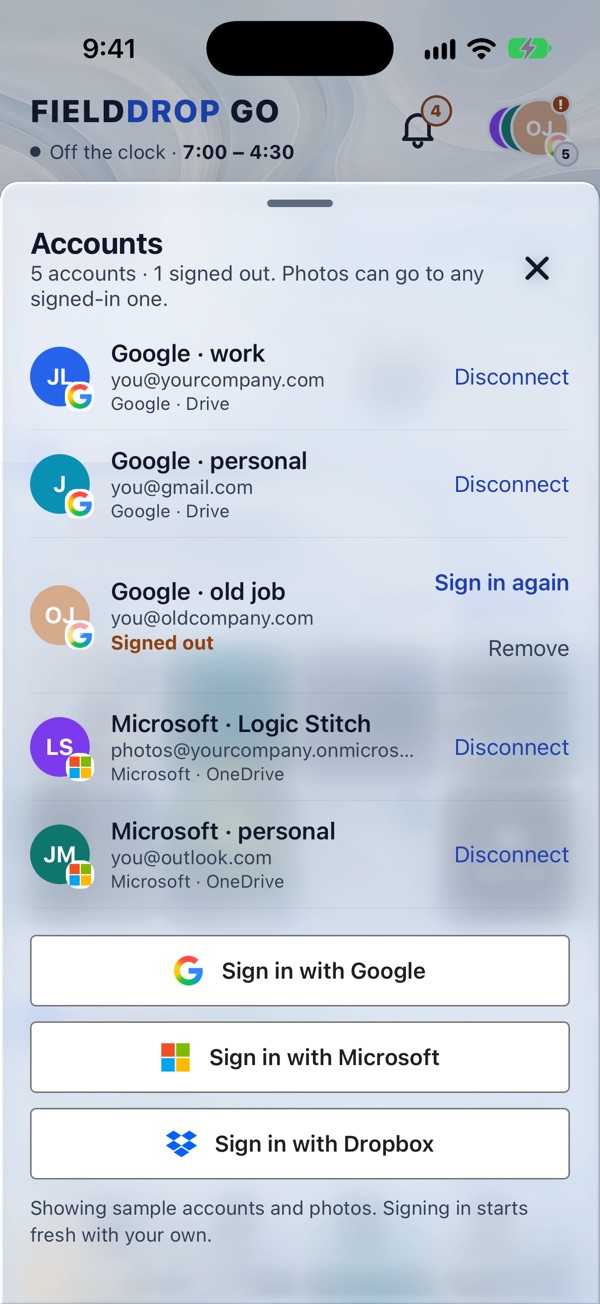
Connect your accounts
Tap the account circles at the top of the Inbox. Add up to 10 accounts, work and personal.
- Your connected accounts. Tap Disconnect to remove one.
- Signed out? Tap Sign in again. Its photos wait until you do.
- Sign in with Google for Google Drive and shared drives.
- Sign in with Microsoft for OneDrive, SharePoint and Teams.
- Sign in with Dropbox. On iPhone and iPad you can also tap Use iCloud Drive. It needs no sign-in.
Step 2
Choose how photos are filed
After your first sign-in the app asks How should photos be filed? You can change it later in Settings → Filing.
- Simple (recommended): one FieldDrop folder. Every job gets its own folder inside it, named after the card. The job folder is made the first time you send.
- I'll pick folders: your company already has folders set up. You choose one for each place.
- SharePoint and Teams: when you pick a folder, choose your Microsoft account, then SharePoint & Teams. Pick the site, then the library, then the folder.
- Need IT approval? Some companies only allow approved apps. If you see Your IT admin needs to approve FieldDrop Go, send your IT admin this page. Once they approve it, tap Try again. Meanwhile, tap OneDrive instead to use your own OneDrive.
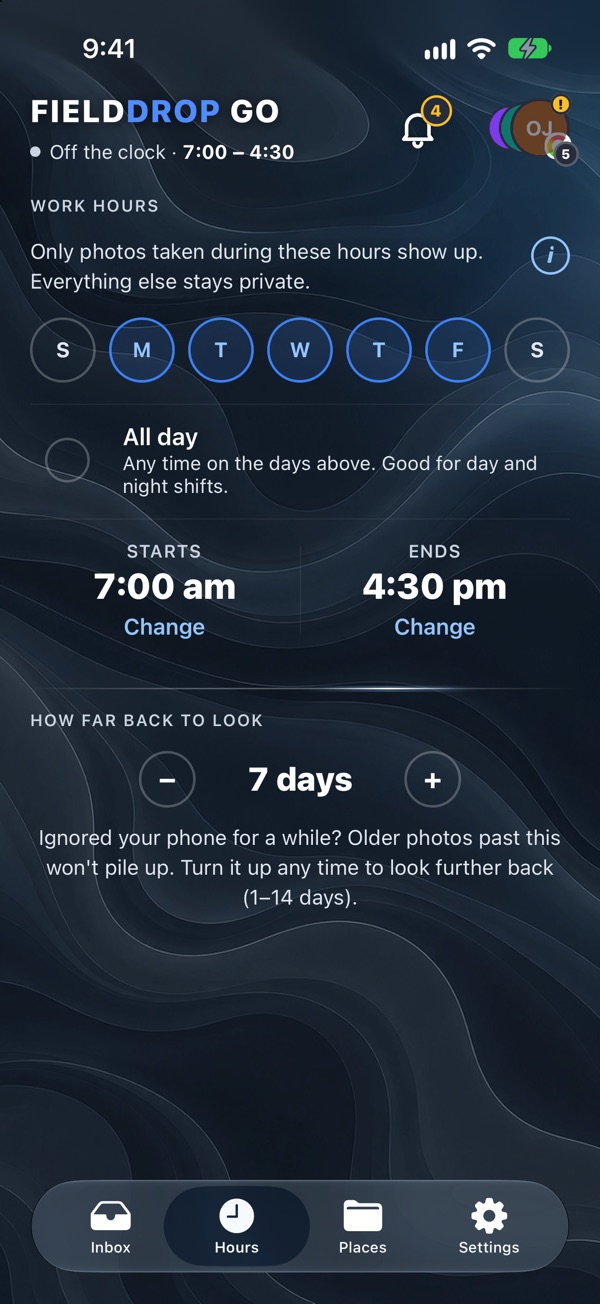
Step 3
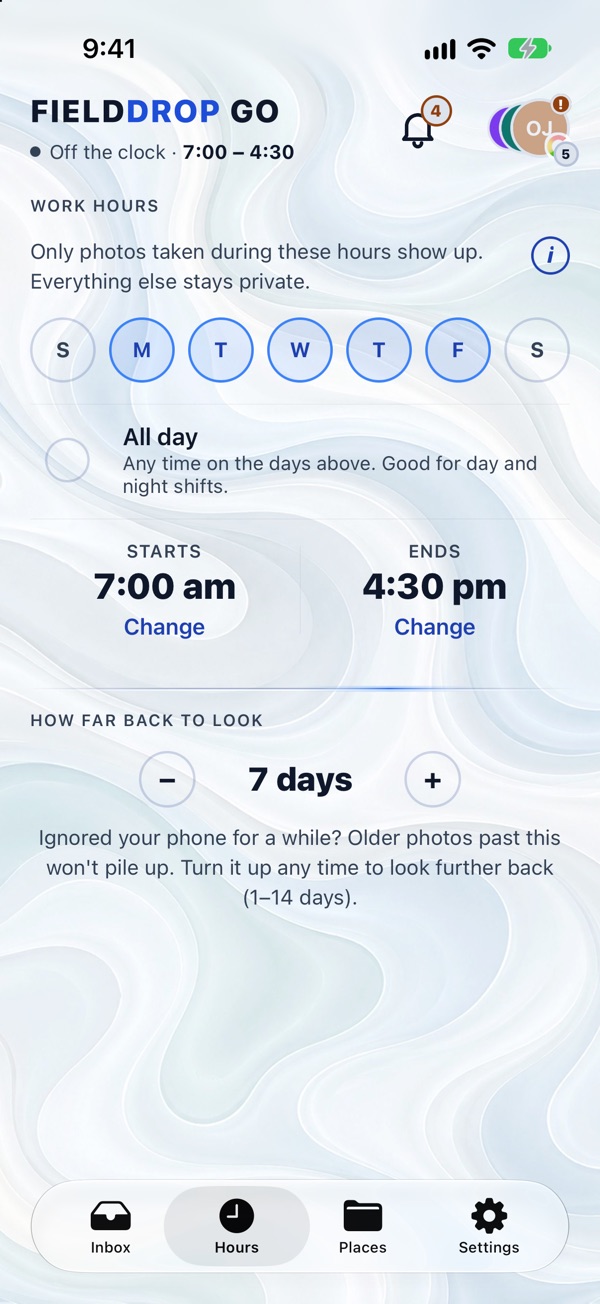
Set your work hours
Only photos taken during these hours show up. Everything else stays private.
- Tap the days you work.
- All day: any time on those days. Good for rotating shifts.
- Tap Change to set when you start and finish. Night shifts that run past midnight work too.
- How many days back to look, so old photos don't pile up.
Step 4
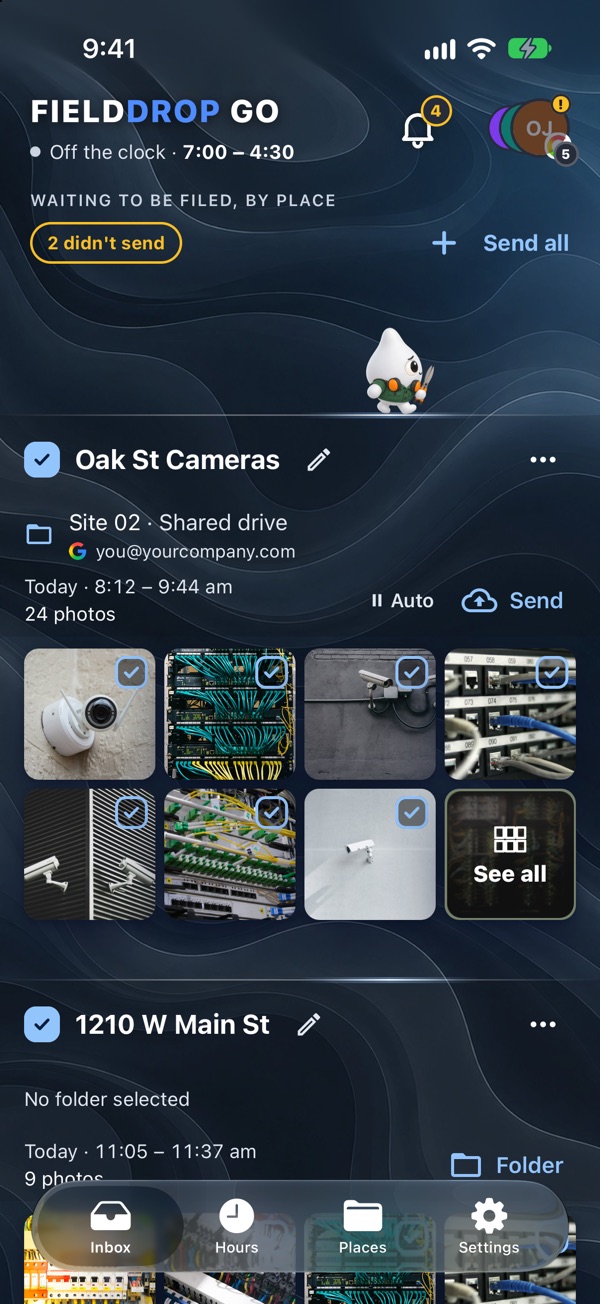
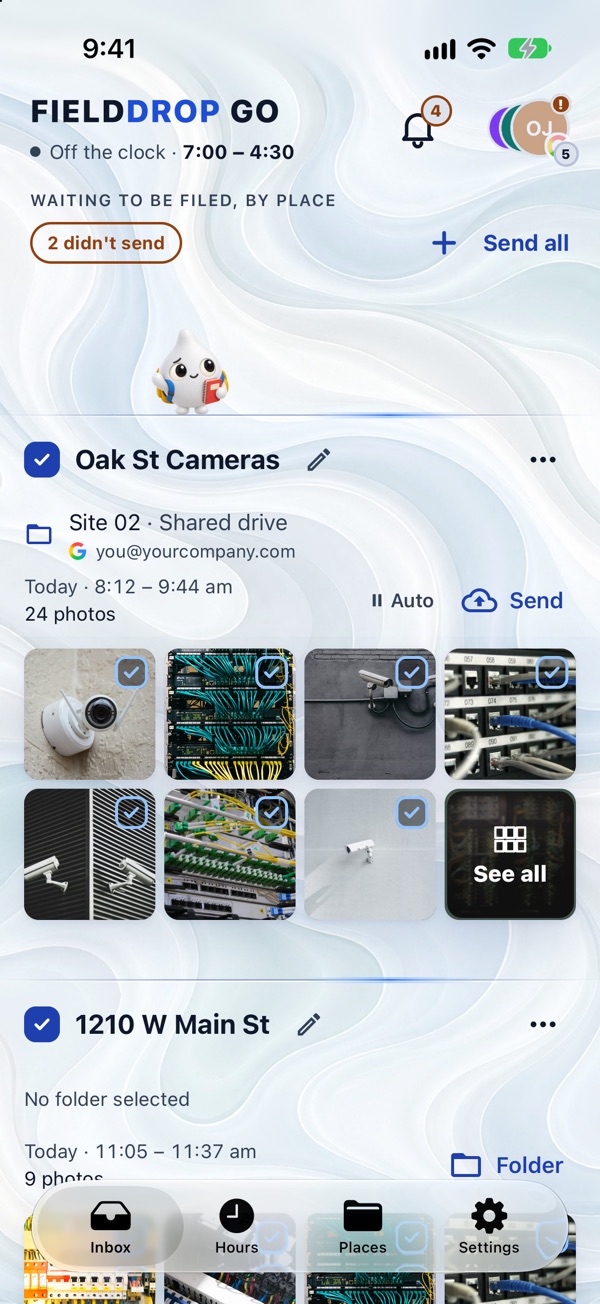
Check your Inbox
Your work photos, grouped by place and time. Keep your camera's location on so photos can group by place.
- The place. Tap ✎ to rename it.
- When you were there, and how many photos.
- The photos. Tap one to see it big. Untick any you want to leave out. See all shows the rest.
- The folder it will go to. It remembers each place.
- Send: one tap and they're filed.
- No folder yet? Tap Folder to choose one.
- Send all: every place that already has a folder, in one go.
Step 5
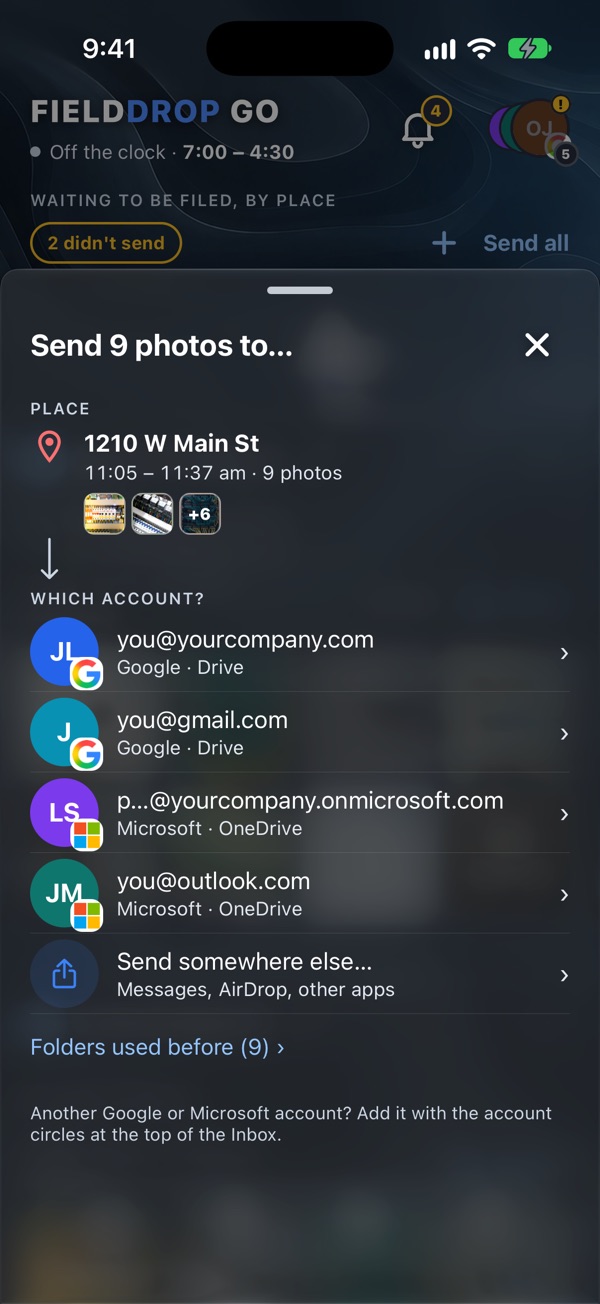
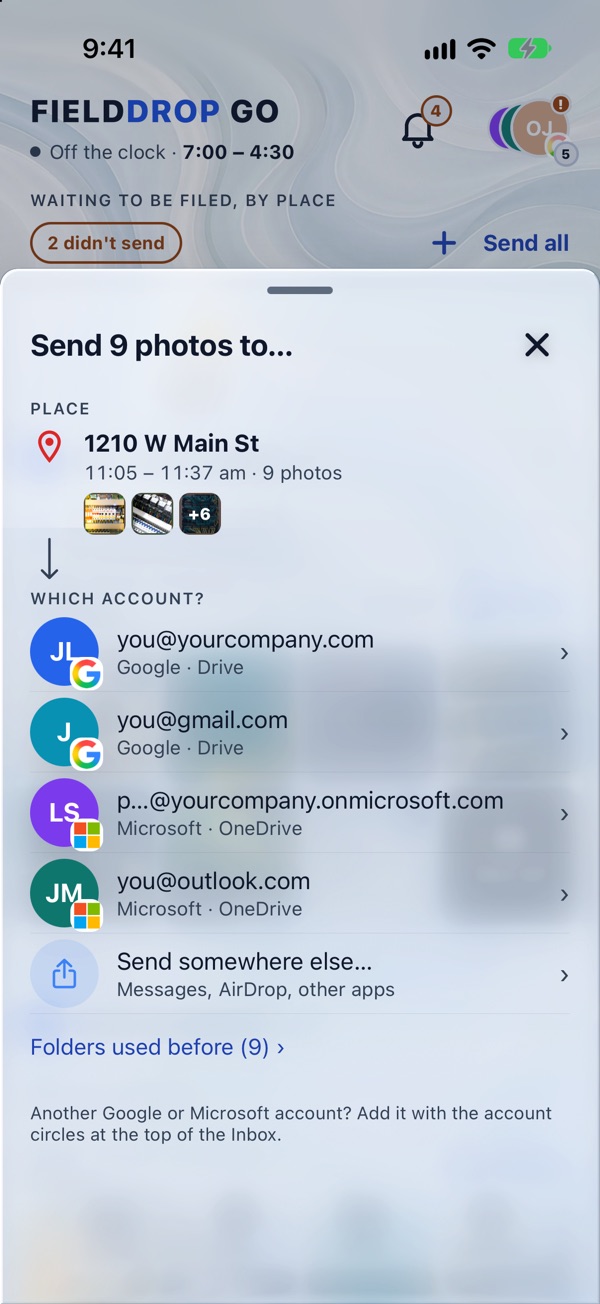
Pick a folder for a new place
The first time you're somewhere new, tap Send or Folder. Next time it's already filled in.
- Folders used before: one tap to reuse one.
- Pick an account, then any folder in it, including shared drives, SharePoint, Dropbox and iCloud Drive (iPhone and iPad).
- Send somewhere else…: Messages, AirDrop (iPhone and iPad) or another app.
- Another Google or Microsoft account? Add it with the account circles at the top of the Inbox.
Step 6
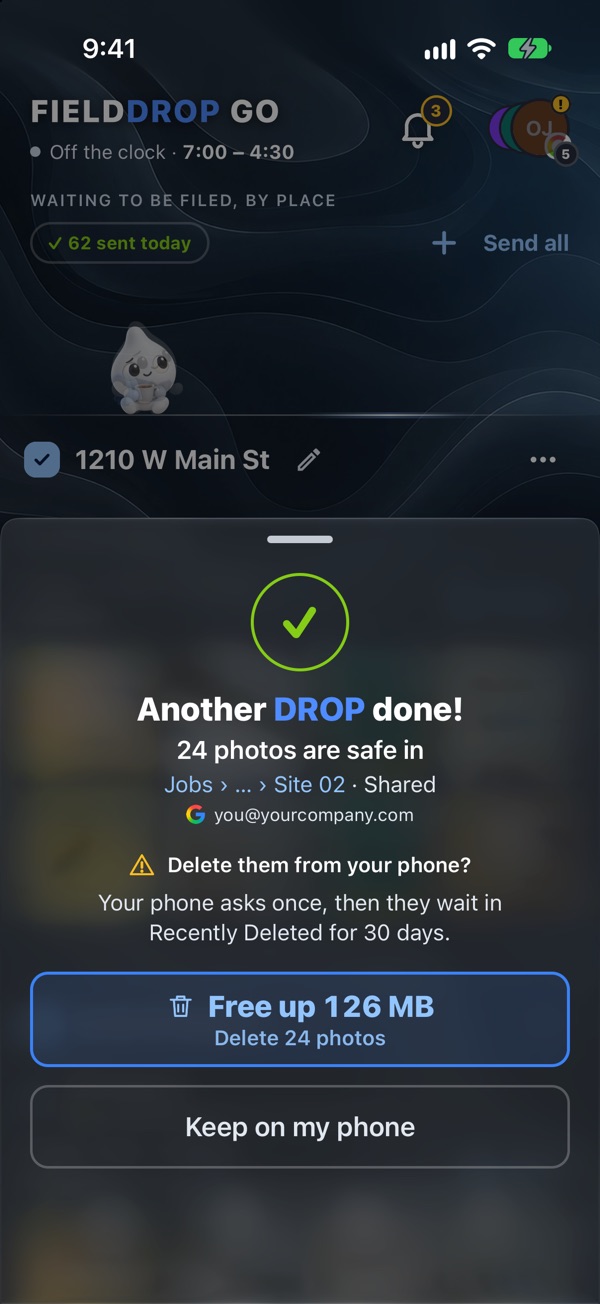
Send, then clear your phone
Photos are only cleared after your Drive, OneDrive, Dropbox or iCloud Drive confirms they arrived.
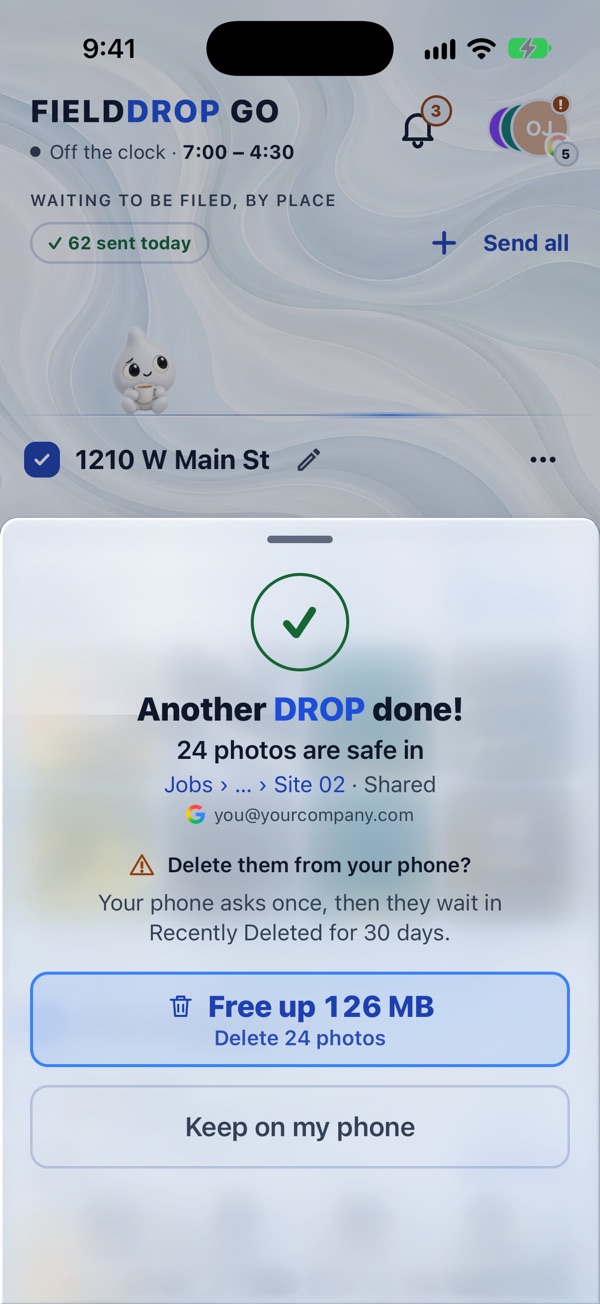
- Where your photos went.
- Free up (it shows the size, like Free up 3 MB): removes them from your phone, after your phone asks you. On iPhone they wait in Recently Deleted for 30 days. On Android they are removed right away (Google Photos may still have a backup copy).
- Keep on my phone: leave them for now.
On iPhone, the Lock Screen and Dynamic Island show how far it got, like "3 of 9". On Android, a quiet notification shows "Sending 3 of 9 photos", with Stop sending. A send you started keeps going after you leave the app. Want to save mobile data? Turn on Settings → Phone → Send on Wi-Fi only.
Places
Your places
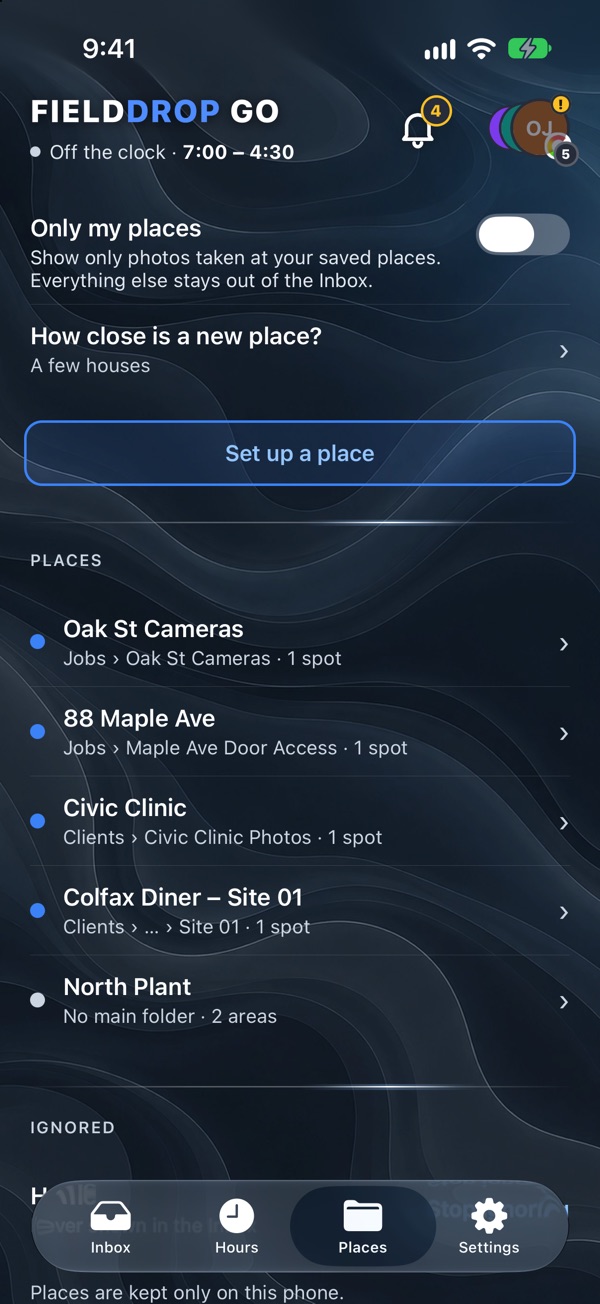
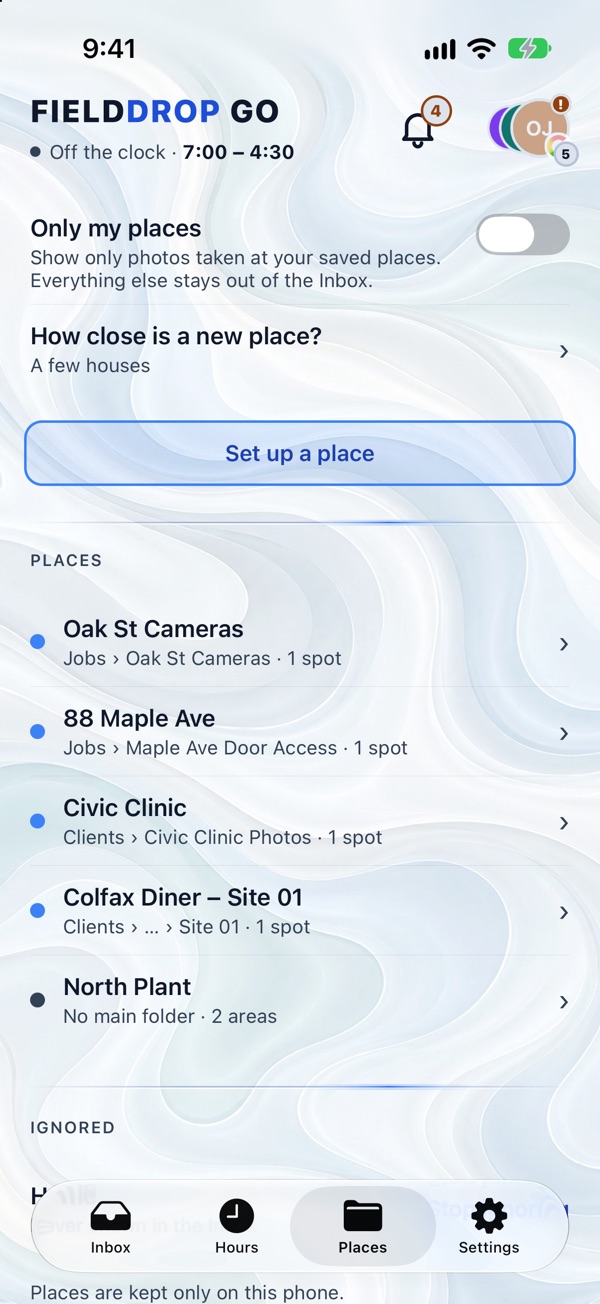
Open the Places tab. A place is a name, its area and its main folder.
- Only my places: show only photos taken at your saved places.
- How close is a new place? One house, A few houses or Big site.
- Set up a place before you go there (see below).
- Your places. Tap one to rename it, change its folder, draw its area, or remove it.
- Stop ignoring a place you told the app to always ignore.
Places
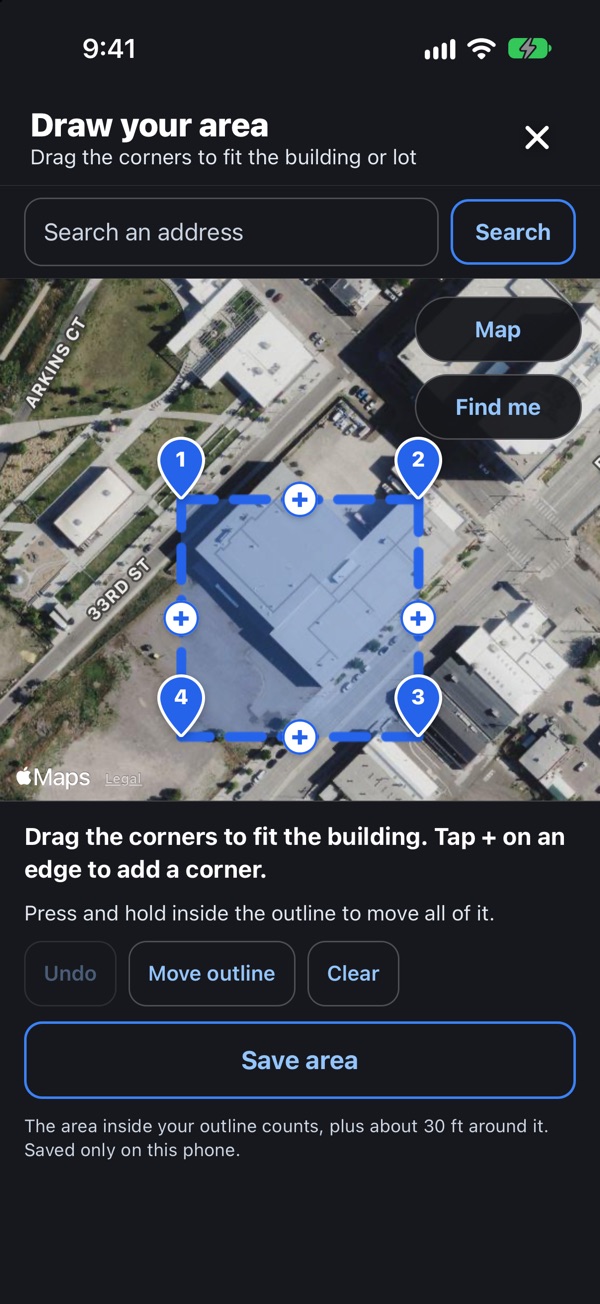
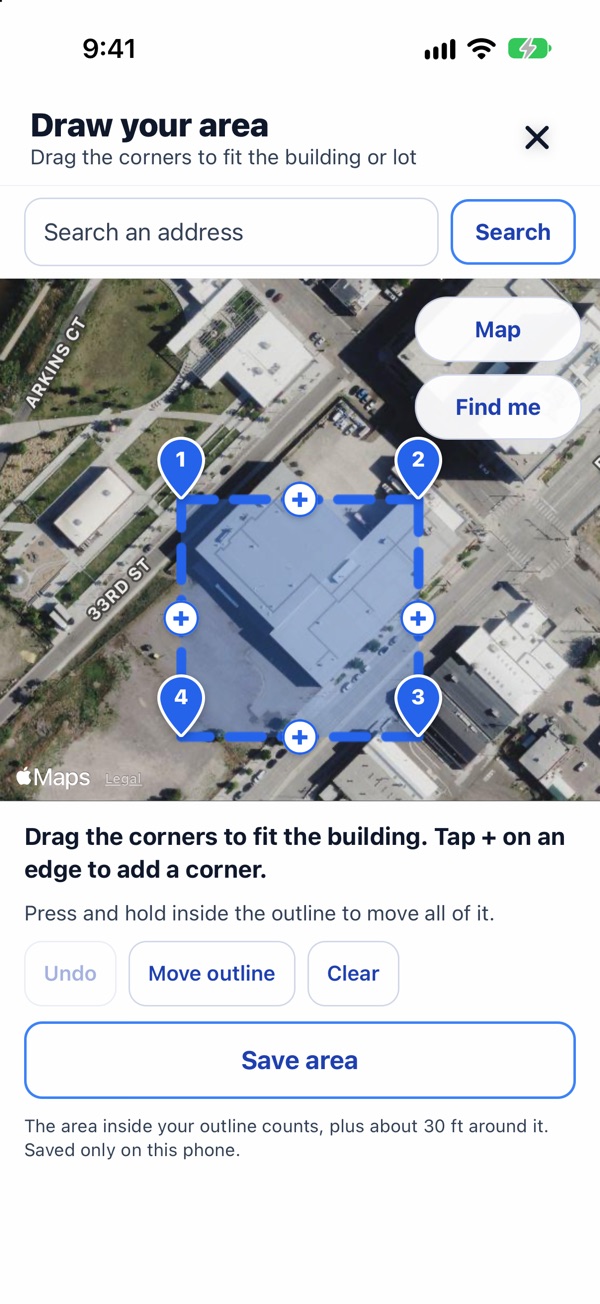
Set up a place from an address
Places → Set up a place → Draw on a map. Or tap Use where I am now when you're there.
- Search an address. Your phone's own map finds it.
- Drag the corners to fit the building or lot.
- Tap + to add a corner. Press and hold inside to move the whole outline.
- Save area, give the place a name and tap Save. Then pick its main folder now, or later.
Cards
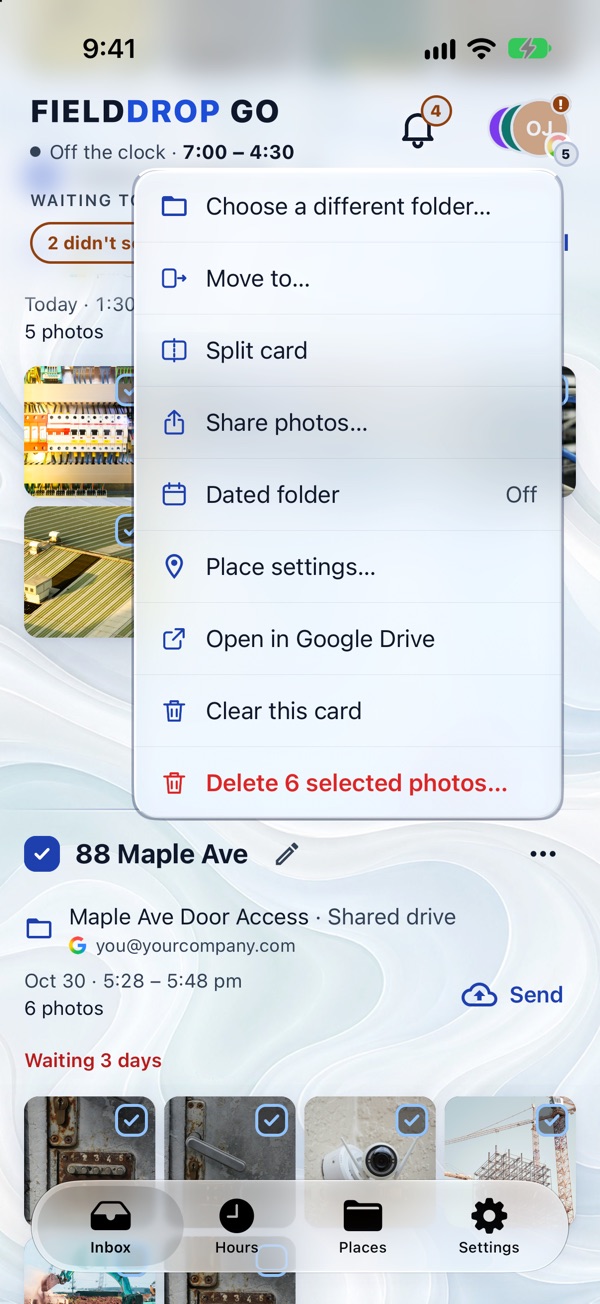
The card's ⋯ menu
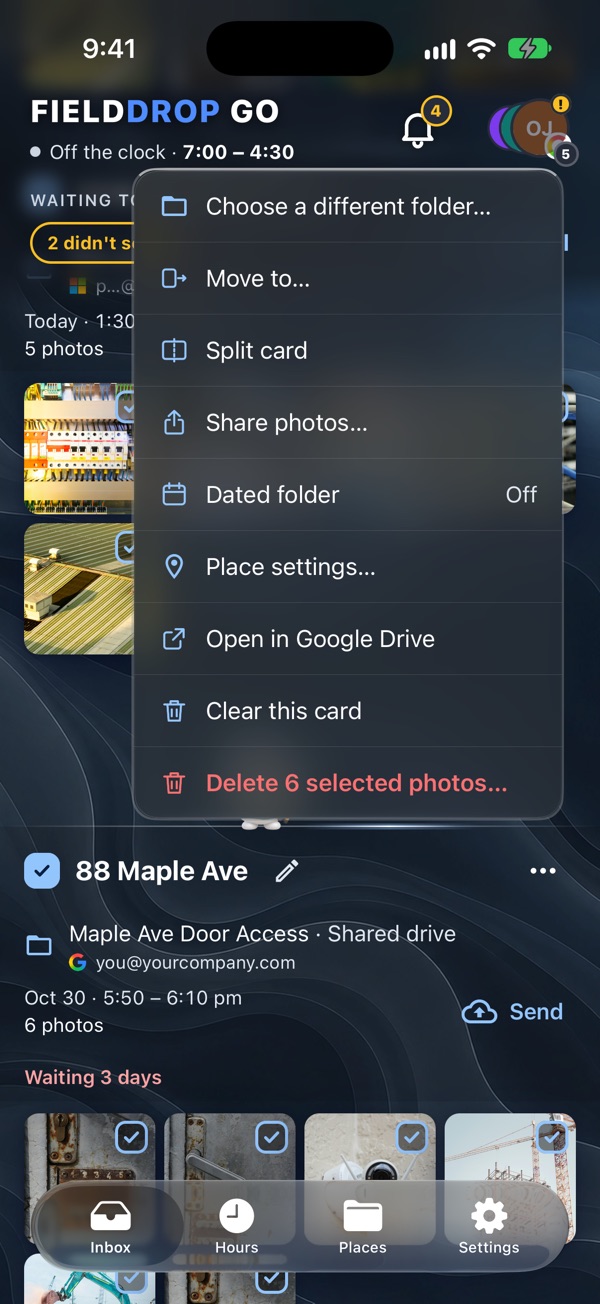
Tap ⋯ on a card.
- Choose a different folder for this batch.
- Move to…: move ticked photos to another card. Move them all and the two cards become one.
- Split card: move some photos to their own card, for example a second job on the same street.
- Dated folder: On puts each day in its own folder, named by date, like 2026-10-28. It changes this card's next send only.
- Place settings…: everything about this place. Put each day in its own folder there makes dated folders the normal choice for the place.
- Clear this card: take it off the list (say, a day off). The photos stay on your phone.
The menu also has Share photos… (see below), Open in Google Drive (or OneDrive or Dropbox) and, in red, Delete … selected photos… from your phone.
Places
Send automatically
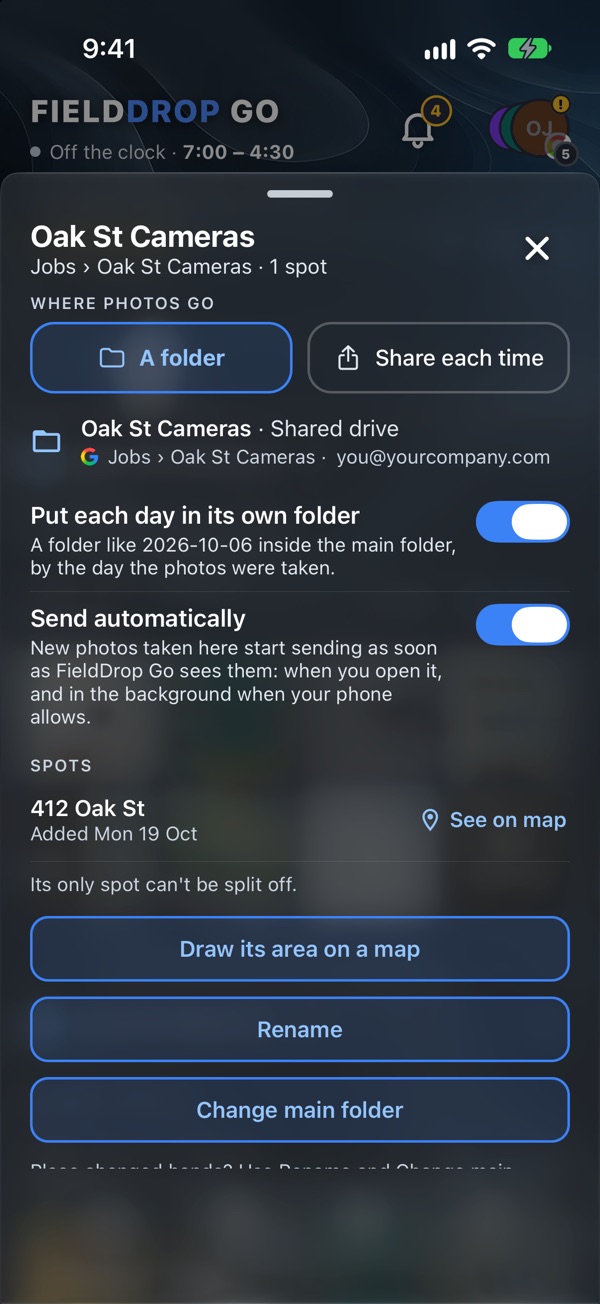
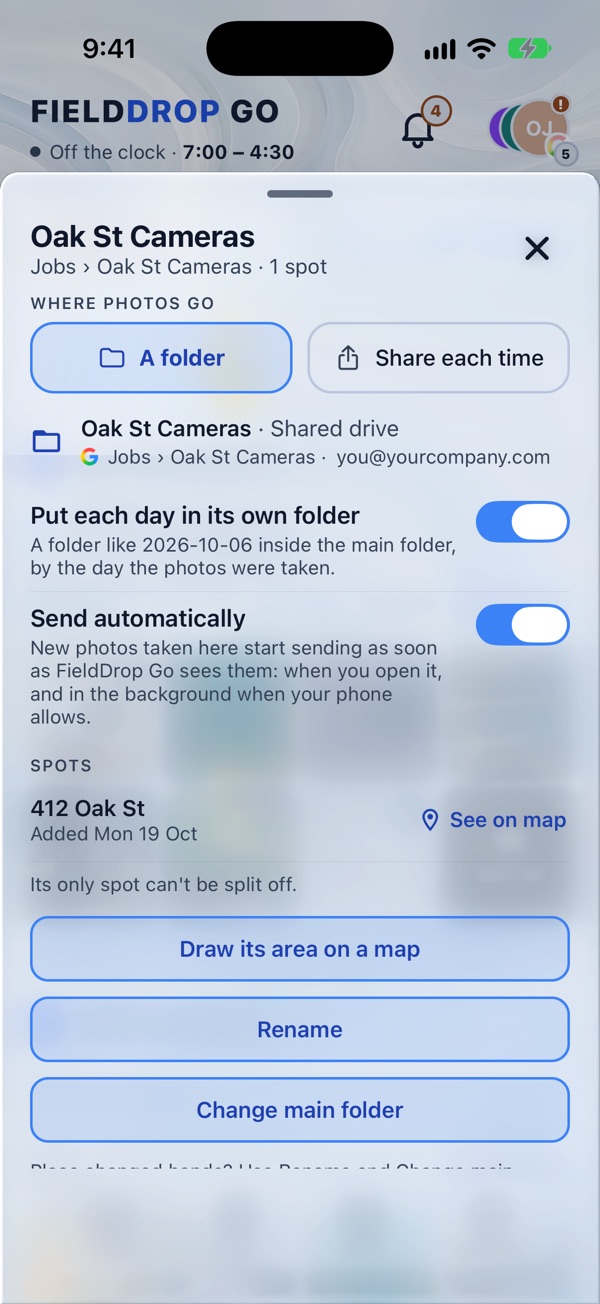
Open ⋯ → Place settings… on a card. The place needs a main folder first. Needs FieldDrop Go Pro.
- Where photos go: A folder (the place's main folder) or Share each time.
- Put each day in its own folder: a folder named by date inside the main folder.
- Send automatically: new photos taken there start sending as soon as the app sees them: when you open it, and in the background when your phone allows.
Each photo waits 30 seconds first, so a burst or a Live Photo is finished. When you open the app there's a 10 second head start ("Auto in 8s · Pause"), so you can stop it first. Only photos inside the place go by themselves, or ones you confirmed (you moved them onto that card, or chose Same place as … when naming it). Tap Auto on the card to pause it, and again to resume. Send on Wi-Fi only still applies. Check your photos now and then: when they're sent, the bell lets you clear them off your phone.
Photos
Look at a photo
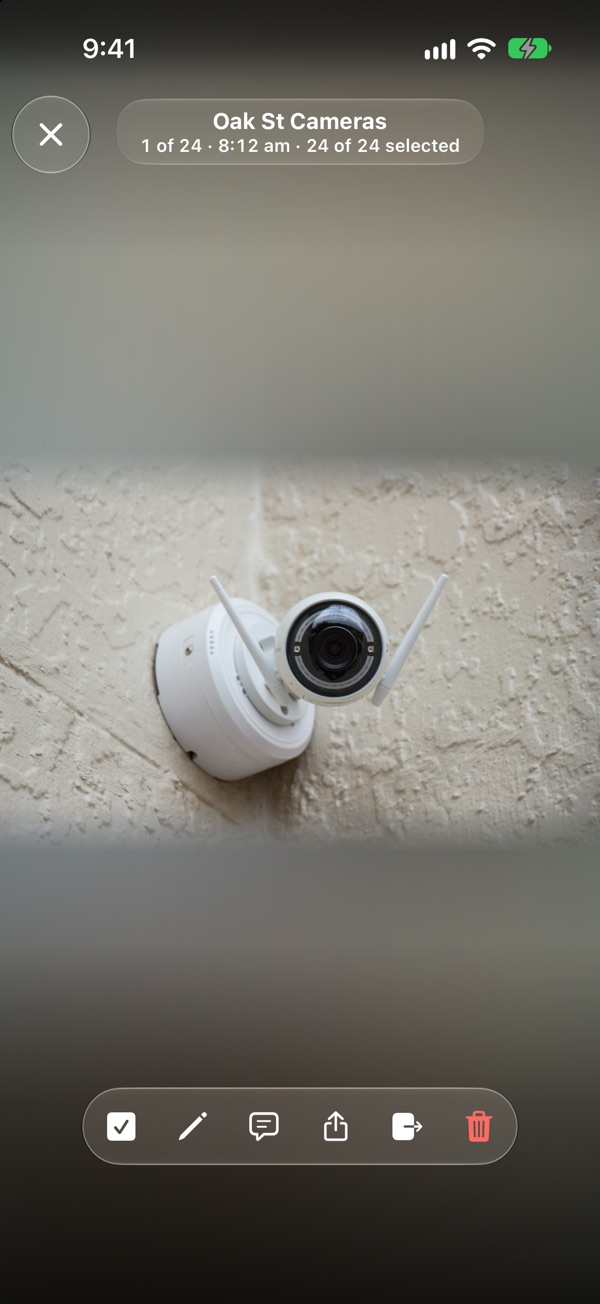
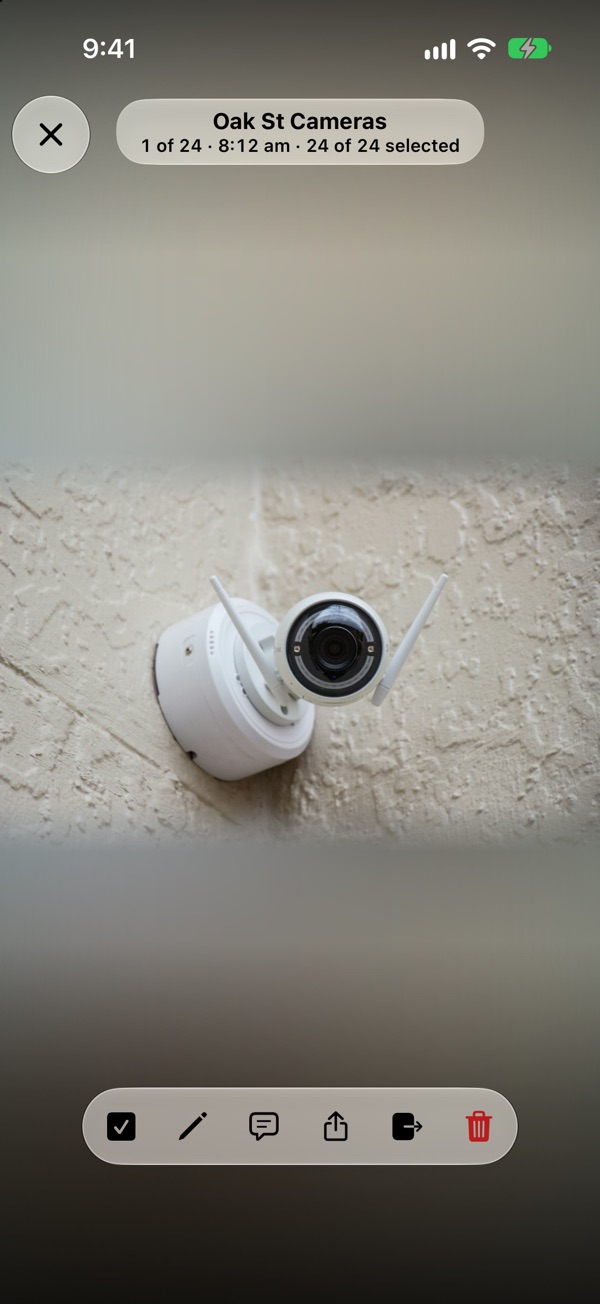
Tap a photo to see it big. Swipe to the next one.
- ✕: close.
- The tick: send this photo, or leave it out.
- Mark up: draw on a copy (below).
- Comment (Google Drive only). It looks filled in when the photo has one.
- Share: send just this photo to Messages or another app.
- Move it to another card.
- Delete it from your phone.
Photos
Mark up a photo
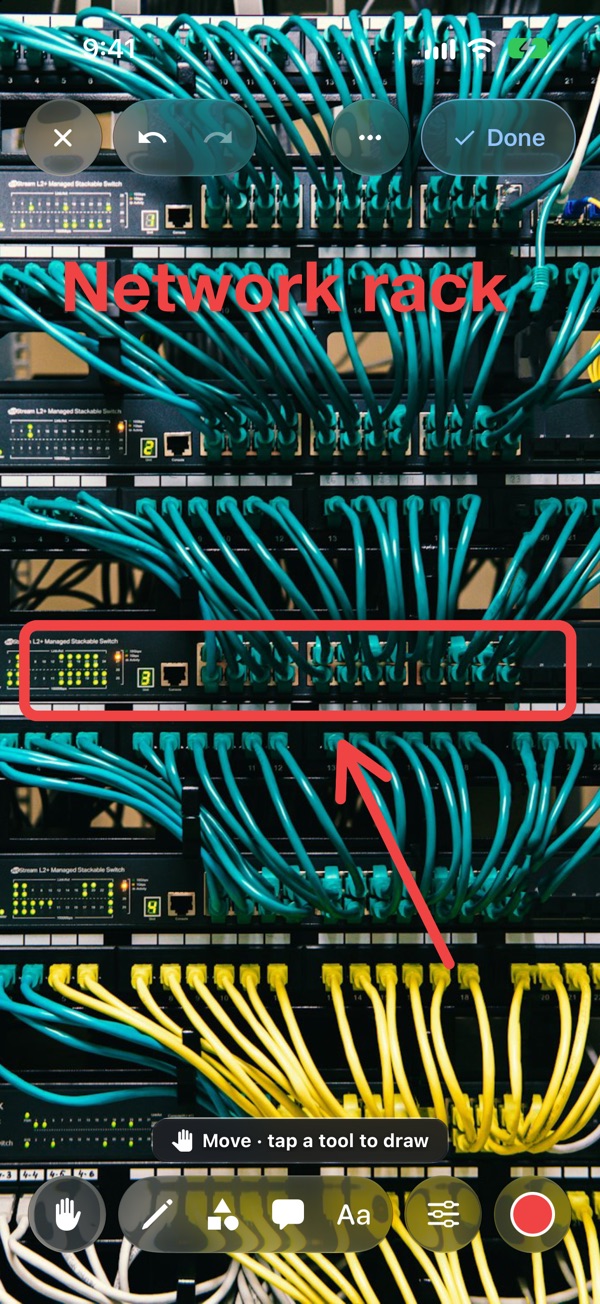
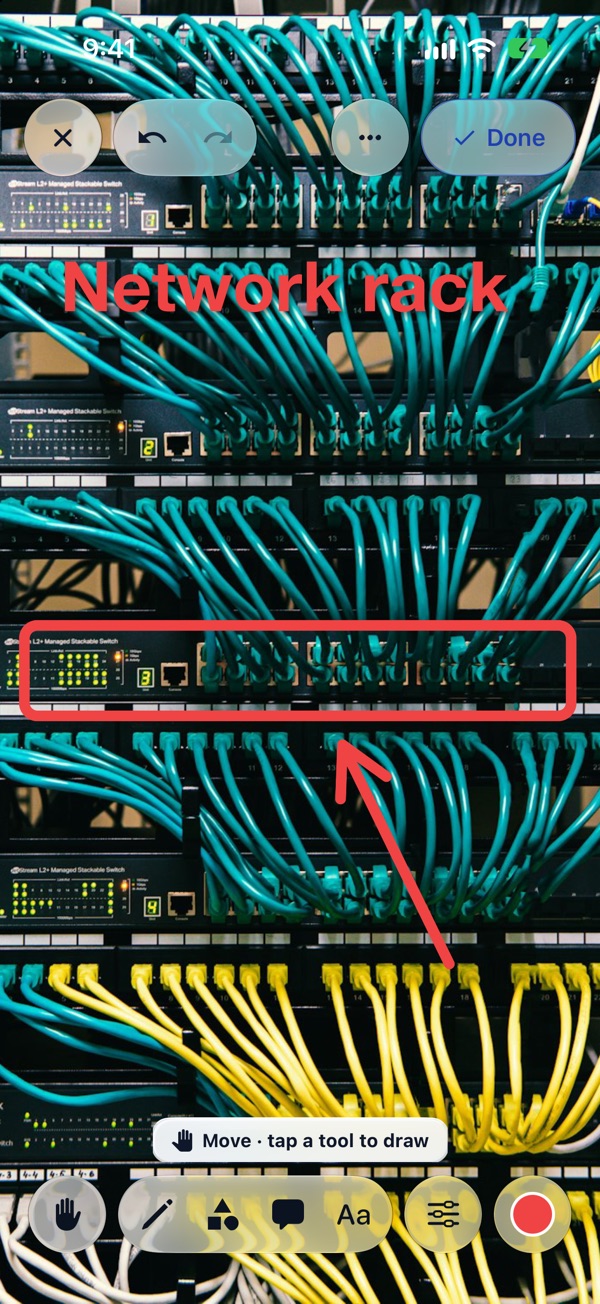
Open a photo and tap Mark up, or press and hold a photo on a card. Your original is never changed. Needs FieldDrop Go Pro.
- Move: pick up a mark to move it, resize it from its corners, or turn it with its round handle (or twist with two fingers).
- Draw: Pen, Shapes, Bubble (a note that points at something), Text (with size, shadow and alignment) and Measure (a line with the size you type).
- Adjust: Crop, Blur (hide faces, plates or screens), Focus (dim all but one area) and Lens (zoom in on a detail).
- Colour: one colour for every tool, with favourites, recent colours and opacity.
- Done saves a marked copy next to the original, tagged M1. Each has its own tick, so send either or both.
Photos
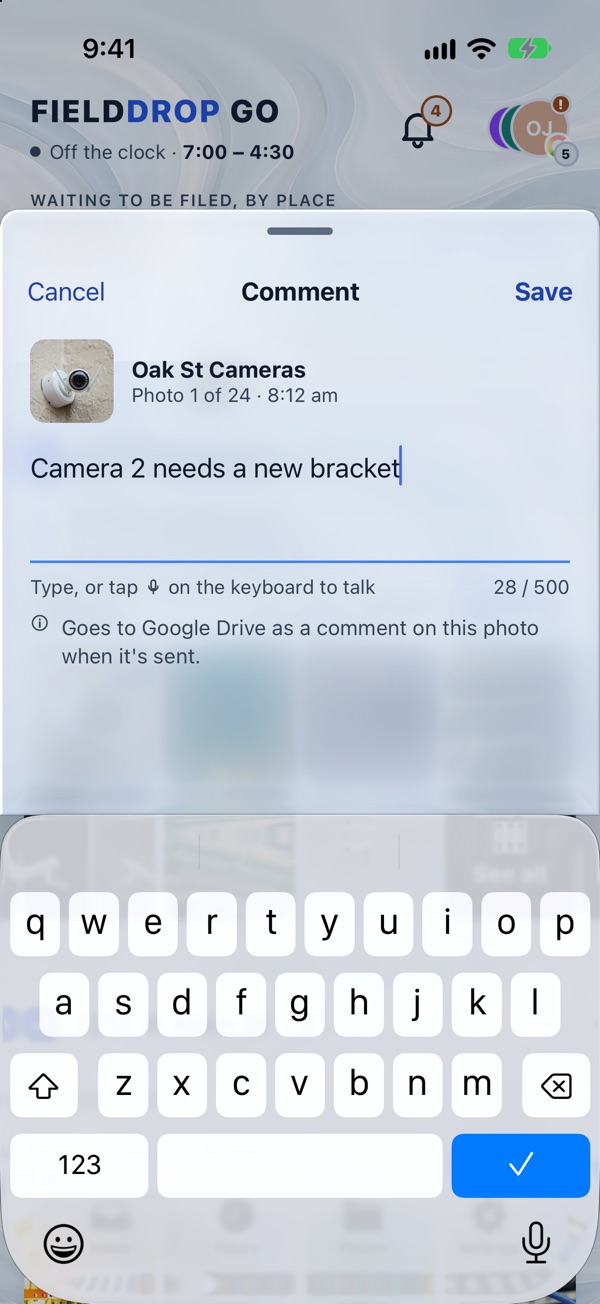
Add a comment (Google Drive only)
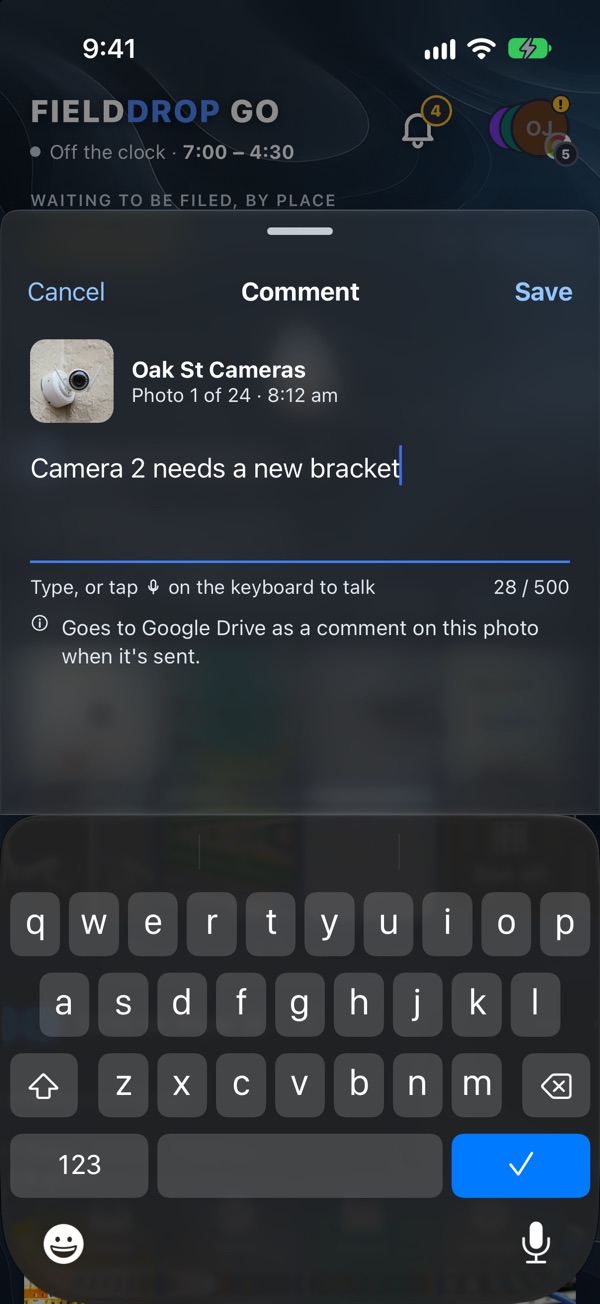
Press and hold a photo, then Add comment. Or tap Comment in the photo's bar.
- Tap Save when you're done.
- Type, or tap the keyboard's mic to talk.
- When the photo is sent, the words are added as a comment on it in Google Drive. OneDrive, SharePoint, Dropbox and iCloud Drive don't get comments.
Photos
Videos
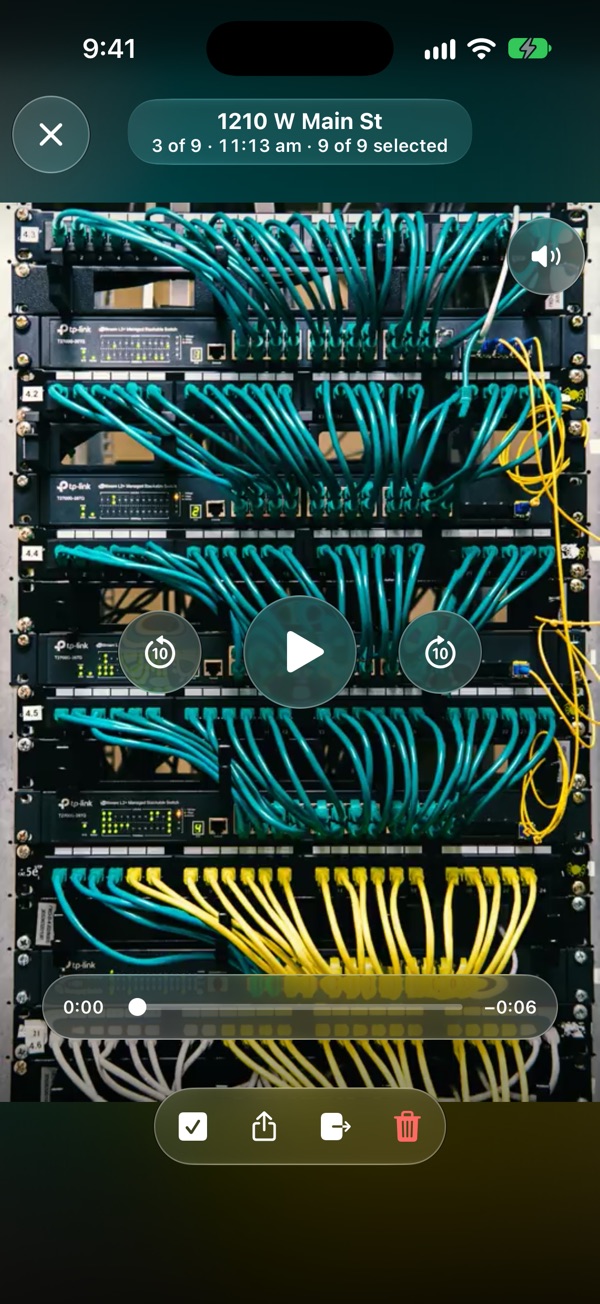
Videos taken during your work hours show up on the card with the photos, with their length on the tile. Tap one to play it before you send.
- Play, or skip back or forward 10 seconds.
- Drag the bar to move through the clip.
- Turn the sound on or off.
Videos send and clear just like photos. Mark up and Comment are for photos only.
Photos
Share photos
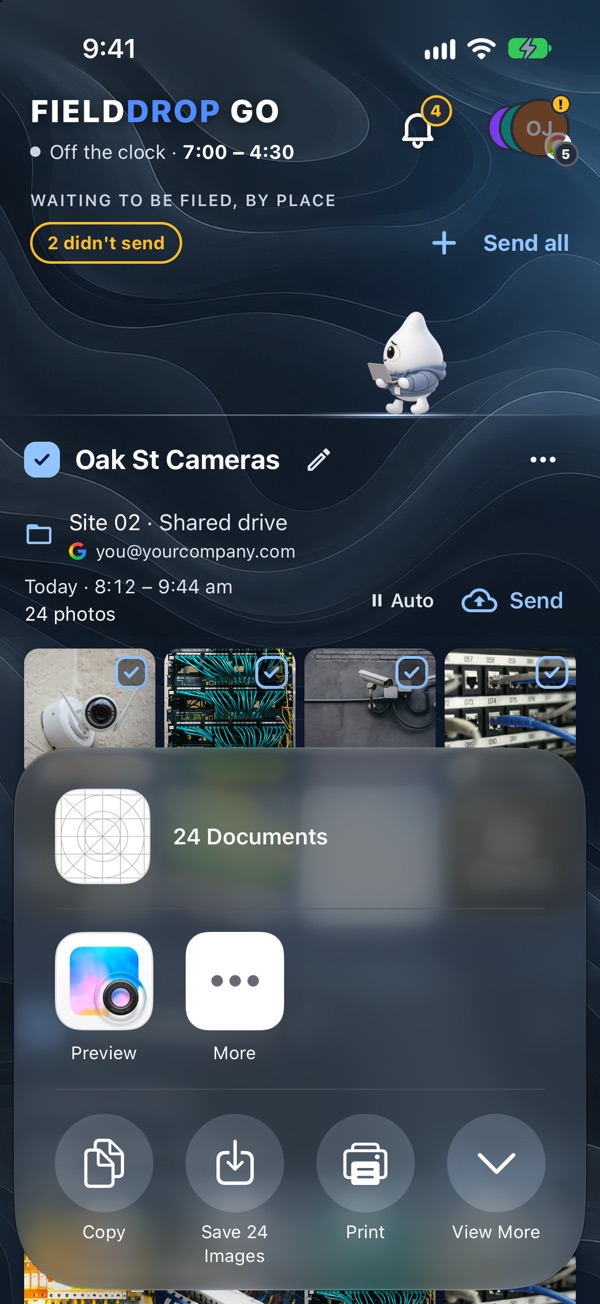
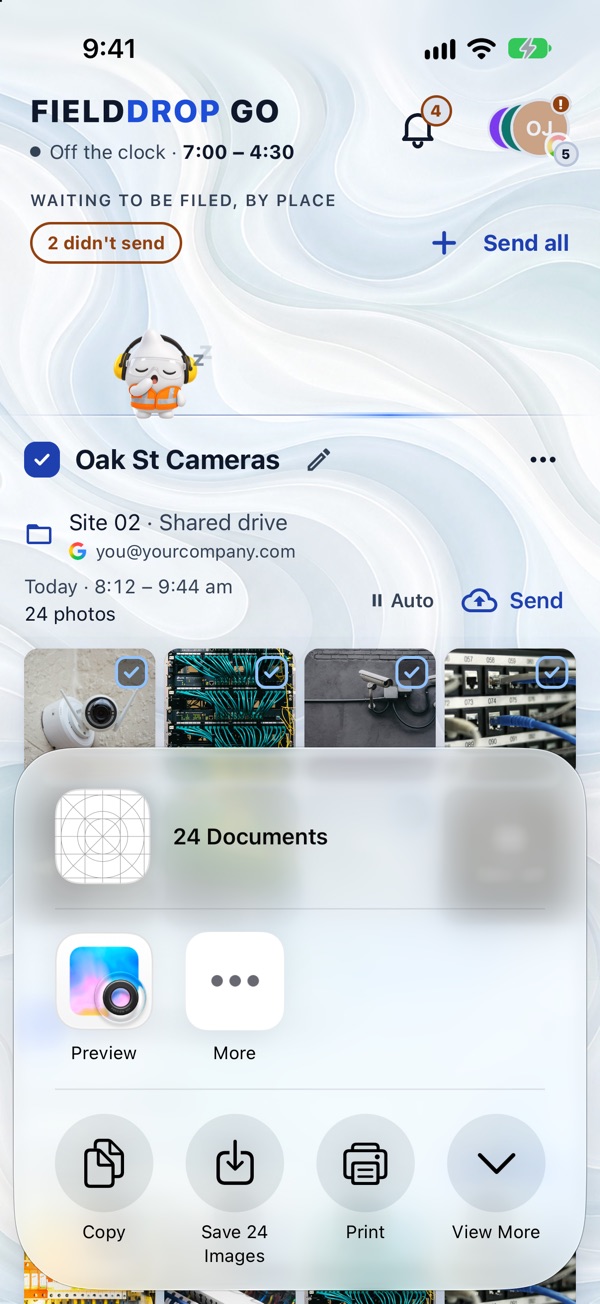
Need to show someone quickly? Tick the photos and open ⋯ → Share photos…, or tap Share on one photo.
- ⋯ on the card.
- Your phone's share sheet opens with them: Messages, AirDrop (iPhone and iPad), email or another app.
- You can also copy, save or print them.
The card doesn't change. The photos stay on it, so you can still send them to their folder.
Extras
See what it has done
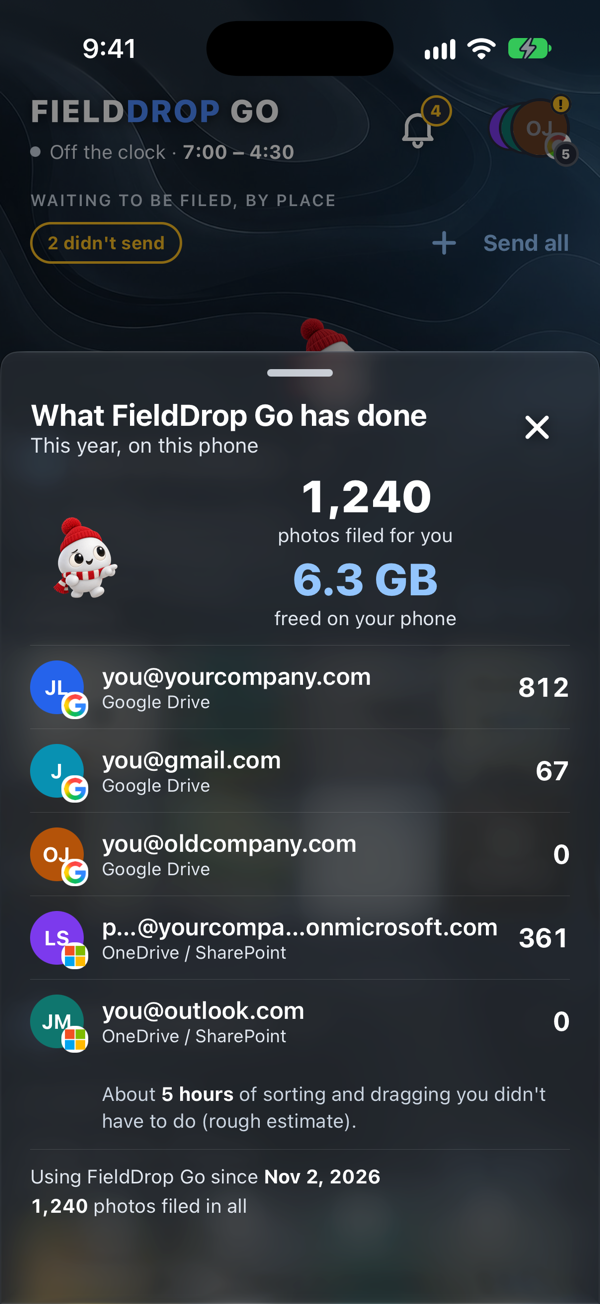
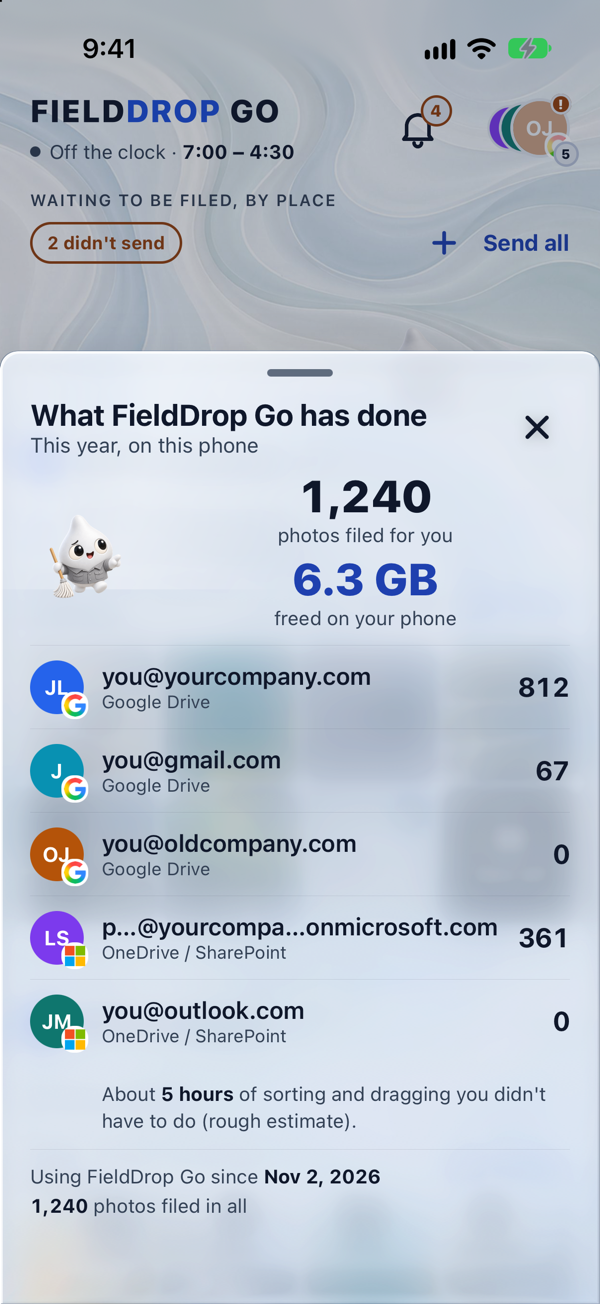
Tap the bell at the top of the Inbox, then See what FieldDrop Go has done.
- Photos filed and space freed this year.
- How many went to each account.
Big screens
iPhone Duo and iPad
The app fits itself to the screen.
- iPhone Duo folded: the normal phone layout.
- Open, or on an iPad: two panes. Held upright, photos on top and your places below. Sideways, places on one side and photos on the other.
- Fold or unfold and you stay on the same card.
- Split View works too.
- Drag photos, or marked copies, out into another app.
Extras
"Please update FieldDrop Go"
Very rarely, an old version can't keep working, for example when Google or Microsoft change how sign-in works.
- The app then shows Please update FieldDrop Go with one button to the App Store or Google Play.
- The update is free. Your places, photos and settings stay just as they are.
- To check, the app reads one small public file on our website. It sends no personal data.
Extras
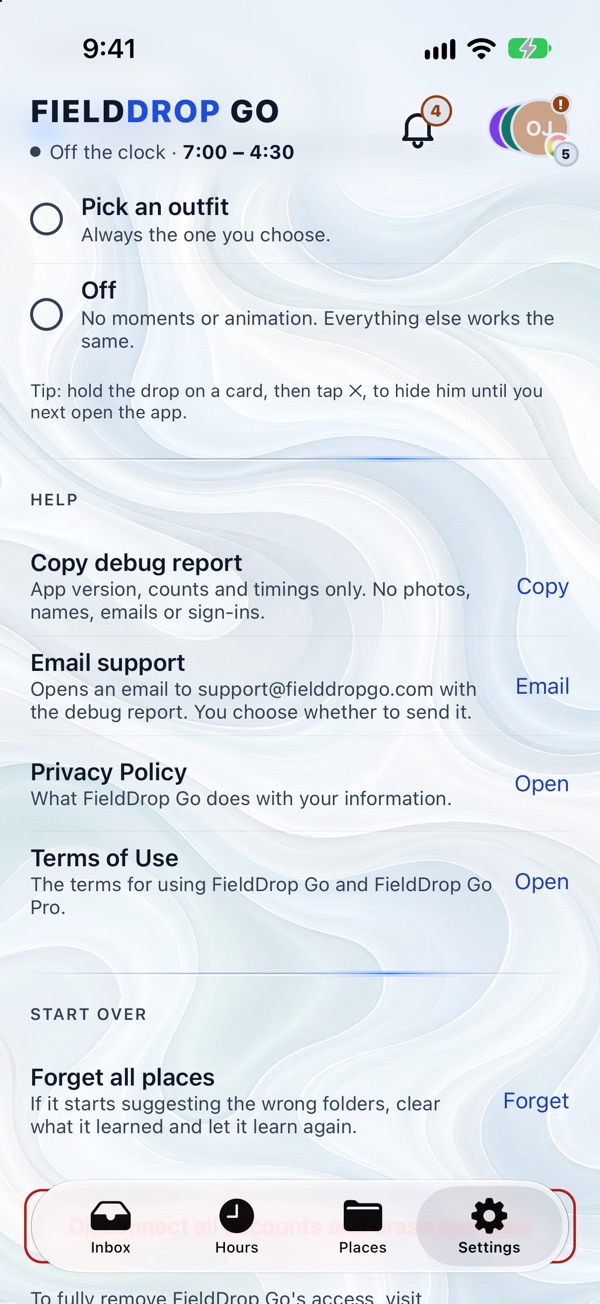
Help and support
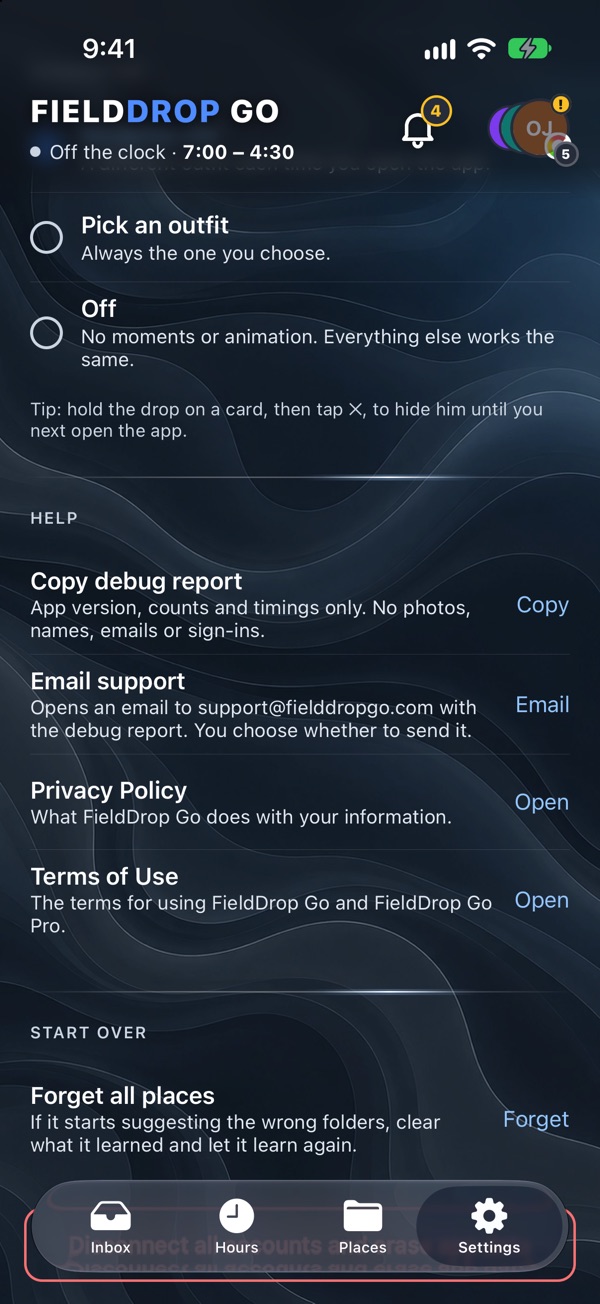
Open Settings → Help.
- Copy debug report: app version, counts and timings only. No photos, names, emails or sign-ins.
- Email support: opens an email to support@fielddropgo.com with a debug report. You choose whether to send it.
- Privacy Policy.
- Terms of Use.
Nothing matches. Try another word, or email support@fielddropgo.com.
Still stuck?
Email support@fielddropgo.com and a real person will help.